
Description
The installation of acoustic panels can vary depending on the specific type of panel and the desired outcome.
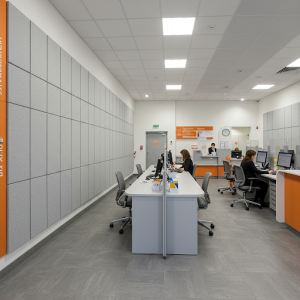
Acoustic panels are special materials designed to regulate sound waves and eliminate unwanted reflections and resonances. They are used in concert halls, recording studios, home theaters, and other rooms where acoustic optimization is required. In addition to their main function, the panels perform a decorative role. They hide surface imperfections and add aesthetics to the interior. Correct installation of these panels is important for creating a comfortable sound environment. We will tell you how we install acoustic panels.
 What are acoustic panels?
Before considering the installation of acoustic panels, it is worth understanding the features of this material. Acoustic panels are high-tech products designed to absorb and disperse sound waves. They are structures made of sound-absorbing material enclosed in a decorative shell. Due to their unique properties, the panels eliminate unwanted sound reflections from walls, ceilings, and floors. They prevent resonances and ensure sound clarity and intelligibility.
Perforated acoustic panels
Perforated acoustic panels offer a compelling solution for noise control in various environments. Their effectiveness stems from the combination of sound-absorbing material and a perforated surface. These perforations, which can be circular, square, or other shapes, allow sound waves to pass through the panel and be absorbed by the core material, typically fiberglass or mineral wool. This process reduces reverberation and echo, leading to improved acoustics and a more comfortable sound environment.
The size, spacing, and pattern of the perforations play a crucial role in determining the panel’s sound absorption characteristics, with different configurations targeting specific frequencies. Smaller perforations generally absorb higher frequencies, while larger perforations are more effective at absorbing lower frequencies. This tunability makes perforated panels versatile and suitable for a wide range of applications, from offices and conference rooms to auditoriums and recording studios.
Beyond their acoustic benefits, perforated panels also offer aesthetic advantages. They can be manufactured in various finishes, colors, and patterns, seamlessly integrating into different design styles. Furthermore, the perforations themselves can create visually interesting textures and patterns, adding an architectural element to the space. Installation is generally straightforward, similar to other types of acoustic panels, often involving mounting them to walls or ceilings using adhesives, clips, or screws. Proper installation is crucial to ensure optimal performance.
Acoustic sound panels
An acoustic sound panel is a special structure for absorbing sound waves and preventing their propagation. It consists of a sound-absorbing material such as mineral wool, polyurethane foam, or polyester foam, with a decorative shell.
Acoustic panel installation is generally straightforward. First, determine optimal placement based on your room’s acoustics and listening position. Mark the desired locations on the wall. Most panels come with mounting hardware.
For lighter panels, adhesive strips or construction glue may suffice. Heavier panels often require screws and wall anchors for secure mounting. Ensure panels are level and securely attached. For larger panels, consider using multiple mounting points for stability. Consult the manufacturer’s instructions for specific guidance. Experiment with placement to fine-tune the acoustics after installation.
Mineral wool acoustic panels
Acoustic panels made of mineral wool are one of the most popular types. Mineral wool is an environmentally friendly and safe material with high sound-absorbing properties and does not support combustion, which makes it ideal for premises with high fire safety requirements.
First, measure your wall and mark the desired panel locations. Then apply a strong adhesive to the back of the panels, ensuring even coverage. Carefully press the panels against the wall, applying firm pressure for several seconds to ensure a secure bond. For larger panels, you may need to use mechanical fasteners like screws or clips for added support. If necessary cut the panels to size using a utility knife, but always wear protective gear like gloves and a mask when handling mineral wool. Finally, conceal gaps between panels with acoustic sealant for a seamless finish.
Acoustic panel island
Acoustic panel islands are ceiling-mounted panels that absorb sound and reduce reverberation. They are often used in open-plan offices, restaurants, and other large spaces where noise can be a problem. Acoustic panel islands come in different shapes, sizes, and colors, so you can find one to match your décor. They are easy to install and can be a cost-effective way to improve the acoustics of your space.
Acoustic panel islands are typically installed by suspending them from the ceiling using wires or cables. The first step is to determine the optimal placement for the island to maximize sound absorption. Then, measure and mark the ceiling for the hanging points, ensuring they align with the panel’s suspension system. Securely attach the wires or cables to the ceiling using appropriate hardware, ensuring they can support the weight of the panel. Carefully lift the panel and attach it to the suspension system, ensuring it hangs level and securely. Finally, make any necessary adjustments to the height or position of the island.
Noise insulation acoustic panels
Acoustic panels for noise insulation are structures for reducing noise levels. They can consist of several layers of sound-absorbing materials separated by sound-insulating layers, such as plasterboard or fiberglass. They are often used in recording studios, offices, and other spaces that require silence and a comfortable environment.
The choice of suitable acoustic panels depends on many factors: the size and type of the room, the requirements for sound insulation, and the design. Different types of panels have different characteristics, and we hope that this information will help you choose the best option for creating a comfortable atmosphere in the room.
How to install acoustic panels on different surfaces
For maximum acoustic efficiency, follow the rules for their placement, focusing on the places of the first sound reflections that degrade the sound quality.
Side walls
Installing acoustic panels on side walls is a crucial step in improving room acoustics. Begin by identifying the listener’s ear level. Have someone sit in the primary listening position and mark the wall at their ear height. This is where you’ll place the initial panels. Visualize or use a mirror to determine the points on the side walls where sound waves from the speakers are likely to reflect. These are the ideal locations for your first two panels. Securely mount the panels at the marked ear level, following the manufacturer’s instructions. This typically involves using screws, adhesives, or specialized mounting clips. Ensure the panels are flush against the wall for optimal performance. While these first panels are important for addressing early side reflections, they’re often just the beginning.
Consider adding more panels to other strategic locations on the side walls, and potentially the ceiling and rear wall, to further refine the room’s acoustics. The number and placement of additional panels will depend on the room’s dimensions, shape, and speaker placement. Remember that the goal is to absorb sound reflections, reducing unwanted reverberation, flutter echo, and comb filtering, leading to a clearer and more balanced listening environment.
Installation of acoustic panels behind monitors
Acoustic panels behind monitors offer a surprisingly effective way to refine your listening environment, especially in situations where monitor placement is less than ideal. The challenge often arises when monitors are positioned too close to a wall. This proximity causes sound waves to reflect quickly, leading to comb filtering and smearing, which negatively impacts audio clarity and stereo imaging. Placing an acoustic panel directly behind the monitors becomes crucial in mitigating these issues.
Centering the panel behind the monitors ensures that the primary reflection point is covered. This placement targets the sound waves bouncing directly off the wall and prevents them from reaching the listener’s ears too quickly. Aligning the panel’s center with the listener’s head level is equally important. This height corresponds to the typical ear position during listening, maximizing the panel’s effectiveness in absorbing those problematic reflections that would otherwise distort the perceived sound.
By absorbing these reflections, the panel helps to tighten the stereo image, improve clarity, and reduce comb filtering. The result is a more accurate and enjoyable listening experience, even when monitor placement isn’t optimal. This simple addition of a strategically positioned acoustic panel can make a significant difference in the overall quality of your listening environment.
Installation of rear wall acoustic panels
Placing one or two acoustic panels on the rear wall at ear level is a smart strategy for improving the acoustics of your listening space. This placement specifically targets reflections coming from behind the listener, which can muddy the sound and make it difficult to focus on the primary audio source. These “back reflections” can cause several issues. They can create a sense of distance or echo that isn’t intended in the original recording, and they can also contribute to comb filtering, a phenomenon where certain frequencies are amplified or canceled out, resulting in an uneven frequency response.
By strategically positioning acoustic panels on the rear wall at ear level, you intercept these reflections before they reach your ears. This helps to tighten up the overall sound image, improve clarity, and create a more focused listening experience. The panels absorb the sound waves, preventing them from bouncing back into the room and interfering with the direct sound from your speakers. This simple addition can make a noticeable difference in the overall quality of your listening environment, allowing you to hear the nuances in your audio more clearly.
Ceiling acoustic panel installation
Acoustic panels are used in closed lattice ceiling systems in offices, lightweight high-performance suspended systems in call centers, and special panels for industrial, public, and sports facilities. Durable, fire-resistant sound-absorbing panels are installed on ceilings and walls to provide good sound absorption over a wide frequency range.
Acoustic panels are relatively simple and easy to install. They are also easy to dismantle which allows their use in rented premises. Together with fasteners, the total weight of the system is small. Therefore, as a rule, there is no need for expensive calculations of static loads on the ceiling and walls.
what methods of fixing acoustic panels exist?
1. Using adhesives
Gluing to the walls and ceilings is the most popular method of installation of acoustic panels. Sound-absorbing panels can be attached to different surfaces: wood, metal, plaster, drywall, brick, concrete, etc.
Inspect the surface before applying glue – usually the old plaster peels off the walls. Then the surface must be cleaned of grease and dust. The glue is selected depending on the type of surface to be finished with acoustic panels.
Types of adhesives
There are different types of glue: hot melt, aerosol, and classic glue. The composition can be applied using handguns, a notched trowel, or a cartridge.
Using a handgun, the glue is squeezed out onto the back of the sound-absorbing panels in strips 5 – 8 mm thick. If the panel is small (600 x 600 mm) two strips of adhesive are enough. But if the panels are larger then you need four strips or more. If you use a notched trowel, the glue must be applied evenly to the surface of the panel.
Easy to apply hot melt adhesive
Hot melt adhesive is very popular for panel installation. This is a special adhesive substance (usually ethylene vinyl acetate or polyamide), which can melt repeatedly when heated and harden when cooled. This adhesive fills voids well and has high mechanical strength. Hot melt adhesive is applied to the panels using a hot melt gun and allows them to be firmly and quickly connected. It is important to remember that it is enough to apply this adhesive only to the corners of the panel.
To fix the panels, you can use other materials, such as liquid nails and self-adhesive textile fasteners or double-sided tape. Such installation methods are very suitable for cases of frequent installation and dismantling of sound-absorbing materials. You can also construct a supporting frame from lightweight metal profiles, to which sheets of gypsum fiber are attached, which are the basis for gluing the foam panels.
The panels can be fixed not only to the walls but also to the ceiling. In this case, they are applied to the ceiling after applying the glue, and then carefully aligned. You need to carefully press the panel to the surface so that the glue penetrates the cellular structure of the panel. Pressed to the surface, they stick instantly; additional support is not required. Depending on the type of adhesive, it is permissible to adjust the position of the panel within a few minutes without damaging the adhesion of the glue. For the glue to adhere well, the room must be well-ventilated.
2. Hanging on cables
Often, panels are hung vertically under the ceiling using cables or fishing lines. This type of installation can be considered universal – it is suitable when access to the ceiling is difficult for technical reasons and installation using glue is impossible.
A steel cable (galvanized or stainless steel) is secured on both sides, with one shackle and two cable clamps for each loop when attaching the panels. To prevent the cable from sagging, it must be tensioned using a tensioning device. If the length of the cable between the attachment points exceeds 10 meters, it is recommended, depending on the load, to use additional suspension support, as well as a second tensioning device located in the middle.
The cables must be secured at special mounting points. In this case, the cables are fastened and tensioned at a distance from each other and at the required distance from the ceiling. The required number of absorbing elements with pre-fixed spiral anchors or mounting hooks are hung on a cable and fixed in the desired place using a clamp. The cable tension must be checked and adjusted after 3-4 days.
3. Frame structure
Acoustic panels can be used as inserts in frames or other supporting structures, such as Armstrong. Such structures are often used indoors to cover ventilation pipes and other ceiling communications. Acoustic panels will reduce noise and create comfortable acoustic conditions.
The panels are laid on a T-shaped profile made of plastic, aluminum, or galvanized steel. Suspended ceilings can be quickly and easily dismantled for inspection or maintenance of hidden engineering systems.
The suspended frame consists of load-bearing and crossbars, cross and corner connecting elements, as well as wall anchors and adjustable hanging elements. Before installing the ceiling grid, it is recommended to prepare a plan for its placement on the ceiling. In this case, it is necessary to pay attention to the fact that the grid in the room is located symmetrically.
Other varieties of acoustic panels
There are different types of acoustic panels, differing in material and design:
Wood-based
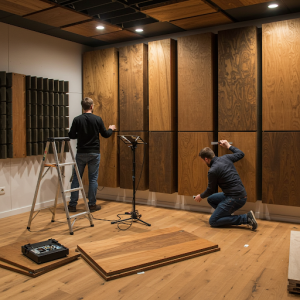
Durable and fireproof panels, easy to install on a metal or wooden frame using screws. They can be painted. Wood-based acoustic panels offer both aesthetic appeal and sound absorption. Installation is similar to standard acoustic panels. First, determine placement based on your room’s acoustics and desired effect.
Mark the wall and use a stud finder if needed for heavier panels. Most panels come with mounting hardware like Z-clips or keyhole slots. Attach the corresponding hardware to the wall, ensuring it’s level. Carefully hang the panel onto the mounted hardware. For larger panels, consider using multiple mounting points for stability. Always consult the manufacturer’s instructions for specific guidance. Ensure a snug and secure fit against the wall.
Installation of acoustic panels made from glass granulate
Fire-resistant and moisture-resistant panels (up to 95% humidity) are flexible and can have various coatings, including photo printing.
Installing acoustic panels made from glass granules is similar to other panel types but with a few considerations. First, ensure the wall surface is clean and level. Mark desired panel locations, considering ear level and reflection points.
Most glass granule panels are rigid and require mechanical fastening. Use appropriate screws and wall anchors suitable for the wall type. Pre-drill holes to prevent cracking the panels. For larger panels consider using Z-clips or other specialized mounting hardware for secure installation. Always consult the manufacturer’s instructions for specific guidance on handling and mounting these panels, as their weight and composition might require particular attention.
Made from MDF
Imitates wooden boards or tiles with tongue and groove joints, which simplifies their installation on the frame.
Each type has unique properties and designs that allow you to select panels for interior and acoustic requirements.
CONCLUSION
Installation of acoustic panels requires careful planning and a professional approach. Proper placement of panels creates an ideal sound balance, ensuring comfortable listening to music, watching movies, or recording. The choice of high-quality materials and professional installation will create an unforgettable experience of immersion in the world of pure and natural sound.